
Rice, in many cultures, is a sacred item.. It is also a world staple food that feeds more people in the world than any other crop!
I was just thinking about the meals we cook in my household, and I realized that almost 50% of them have some rice in it.
This is why it is particularly frustrating when you find that you’ve cooked rice incorrectly and it ends up sticking to the bottom of the pot. If you’re anything like me, you need to learn the hard way.
Trust me, I have gone through various batches of rice. Some of them were very hard and some came out extremely indistinguishable and mushy.
Use this as your guide to ensuring you cook rice perfectly every single time. We will take you step by step and even complete the process ourselves while you’re reading this now!
If you are a video fan, you can see the details here:
Understanding Rice Fundamentals
Before you cook rice, there are a few fundamentals to understand. The following instructions will help you cook rice the right way..
An important note is that there are various types of rice. In fact, there are more than 40,000 types of rice! It’s an incredibly complicated subject to broach, but we are doing our best here.
Here are the commonly used types of rice and their unique characterisitics:
Brown Rice: needs a longer cooking time than the others. Brown rice is also more healthy and has less starch.
White Rice: there are various kinds of white rice but they are very starchy.
Long Grain Rice: one of my favorite types of long grain rice is Basmati.
Short Grain Rice: sushi rice and risotto rice (also known as arborio rice) are usually what people think of when they think about short grain rice.
With so many varieties, and with numerous health benefits, it’s easy to understand why rice is a highly regarded staple in many dishes.
Why Does Rice Stick to the Pot?
Rice may stick to your pot because the pot has been scratched or worn down and has lost a lot of its non-stick qualities. You may be using less water when cooking rice. Don’t worry, we have solutions for both of those mistakes..
Another reason is that you may have overcooked the rice. Have you ever tried taking rice out of the pot only to find a hard outer layer of burned rice that is all crusty and crispy? That is definitely overcooked rice.
To prevent any timing issues from occurring again, you might want to check out this timer on Amazon.
How to Cook Rice Properly
What you’re about to read is a step by step guide on how to prevent rice from sticking to the bottom of your pots and pans every again. This method is fool proof and will work with mostly any long grain or short rice.
Step 1: Prep Your Pot
Prepping your pot with a little bit of oil or butter should do the trick. Be careful not to add too much or too little. Adding about 1 teaspoon of butter or oil to the pot and then spreading it around until it coats the entire pot should do the trick.
You can leave this aside and go on to the next step.
Step 2: Measure It Out
Since I’ve cooked my fair share of rice, I don’t find the need to measure it out to get the proportions right. However, not everyone operates in this manner.
If you can’t “eyeball” it, then the best advice is to use a digital scale. If you don’t have one, then check out the most recent price for this digital scale on Amazon.
Once you are confident with the amounts, add both rice and water into the pot. There should be more water in the pot than rice.
Step 3: Wash Your Rice
Do you notice a chalky outer covering when you closely observe the rice ? This very thin powder comes from the shipment, and when rice moves from country to country their starch rubs off on each other as the grains move around in transit.
I have come across many novice chefs that have told me that they do not wash their rice ahead of cooking. Let me explain to you why this is a no-no.
Reason 1: Bacteria Can Remain
Uncooked rice can host bacteria that can also withstand the heat generated in the cooking process. The bacteria (Bacillus cereus) can cause food poisoning. This is why you should always rinse your rice before cooking it.
Reason 2: Too Much Starch is Bad for Your Pot
Rice is coated in a nice little layer of starch. When it gets wet, it becomes very sticky. By washing the starch off the rice, you are indirectly ensuring that the rice does not then stick to the bottom of your pot.
When you wash the rice, do so with cold water. You may use a strainer to help with the rinsing cycles.
When you wash the rice, run your hands through it almost as if you are scrubbing it. This will remove the starch that coats the rice.

Rinsed rice inside a copper pot
Step 4: Respect the Golden Ratio
Okay, this important piece of advice was garnered after interviewing a slew of my friends who do, indeed, cook a lot of rice.
There is a special ratio to consider when cooking rice, and it has to do with getting the correct amount of water inside the pot.
The Importance of 1:2
This ratio means for every one cup of rice, one must add two cups of water. We do this for a few reasons:
The 1 cup to 2 cup ratio means that the rice will not burn and stick to the bottom of your pot.
Remember that rice is very absorbent. The water will boil and the rice will soak it up, making it extra fluffy.
Important note: The golden ratio may differ from rice types, but as a general rule, you will want more water than rice in the pot.
Step 5: Cook the Rice
Once everything is inside the pot, it is time to bring it to a boil. Keep the lid off when you are doing this. As soon as you see the food bubbling up, which means the water is boiling, bring the temperature down a few notches.
Optional tip: It is okay to put a little bit of salt inside the pot to give the rice some flavor. I usually just sprinkle a tiny bit. Sometimes, I even stick a stock cube inside to give it a more brothy flavor.
This is easiest to do on a gas stove because you simply turn the dial down. On electric stoves you will need to lower the temperature about two to three notches down.
The idea here is that the rice will need to simmer. Put the lid back on and let the rice simmer for 10 minutes. Start a timer on your phone if you need.
Step 6: Let the Rice Rest
After your rice has been cooking at a low boil for about 10 minutes, take the rice off the stove and let it rest for about 10 minutes. You will want to remove it from the heat.
The rice will then continue to absorb the moisture and cook. This is the fun part because the rice fluffs up a lot during this process.
Quick tip: Cover the pot with a tight lid t. This will allow the rice to continue cooking before you take the lid off, fluff it up, and serve in a bowl.
Step 7: Fluff up and Serve!
Arguably the best part about cooking rice is actually getting to serve it. Lift the lid and gently fluff up the rice with a fork. Make sure to avoid squishing the rice too much.

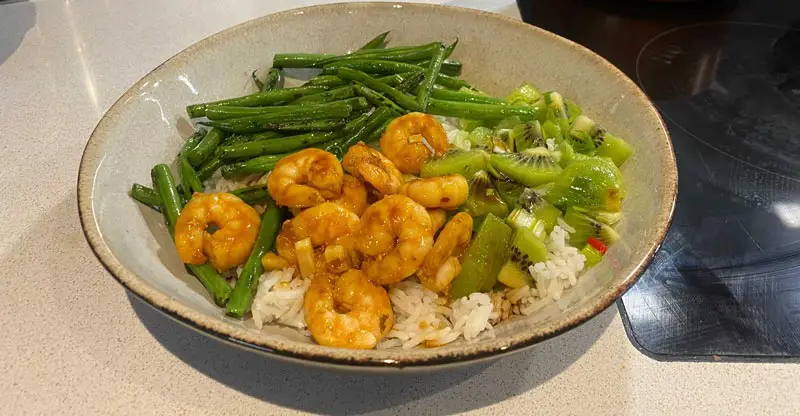
Fluffed up rice for my unconventional poke bowl!
Once you’re done with the cooking you want to clean up next. Cooking rice is relatively mess-free but sometimes (if you’re a beginner like I once was) the water will boil over and spill onto your cooktop.
Read this guide on how to tidy up when this happens!
Your Most Frequently Asked Questions - FAQs
You will find answers to some frequently asked questions when it comes to cooking rice and rice based recipes!
What if I Only Have a Rice Cooker?
Preventing rice from sticking to the bottom of a rice cooker is relatively pain free as a rice cooker’s main responsibility is to cook rice perfectly (well almost).
If you have a rice cooker, consider using it every time you make rice. Rice cookers generally “get it right” 99.9% of the time.
However, if you want to develop a new skill (and impress your friends and family), then I recommend you try to make rice on your own at least once.
The Instant Pot is a great rice cooker, I have one at home and I love it. It also does more than just cook rice but we will leave that discussion for another day!
Related reading: There’s so much to do with rice. Learn how to make your very own rice flour with our handy guide.
What Can I Use Instead of Oil to Prep My Pot?
Oil is used to coat the bottom of the pot so that rice will not stick to it . This is useful for older pans that may have lost their nonstick qualities.
Instead of oil you can use the following:
Butter
Margarine
Of course, vegetable oil is what most people reach for when it comes to coating the pan. oil t For healthier alternatives, try olive oil, avocado oil, or coconut oil.
Read more about different kinds of oils and their smoking points in our article about using oil in an air fryer.
What If I Cook Too Much Rice?
If you find that you over measured and cooked too much rice, that is absolutely fine! Rice will keep in the fridge for a couple of days.
Did you know that some rice recipes specifically require cold rice? Yes, we are talking rice that has been refrigerated for one or two days. One of these yummy dishes happens to be egg fried rice. So, go ahead and make this dish with your leftover rice..
How Long Can I Store Rice in the Fridge?
Rice will stay fresh in the fridge for up to three days. I wouldn’t store it any longer than that because bacteria spores will start to appear and one can get very sick from spoiled rice.
Final Thoughts
There you have it! Our fool proof guide on cooking rice without it sticking to the bottom of the pot.
It is frustrating when you’re making an effort to cook a tasty meal only to find the rice stuck to the bottom of your pot.
Hopefully this has provided you with practical steps to prevent this from happening, and cook a delicious batch of rice for your friends and family.
Practice makes perfect, and the more you practice cooking rice… the better you will get.
Have you tried to cook rice recently? If so, how did it go? Let us know in the comments below.

Food has been a staple in my professional life for quite some time. I worked in a cupcake bakery in my hometown for 2 years, I worked in digital marketing for food brands such as Hellmann’s and Knorr within Unilever, and now I am writing food articles about the best cooking appliances for your home and how to cook some of my favorite recipes.
- Can You Use Aluminum Foil in the Air Fryer? [Five Tips & Tricks] - January 23, 2024
- How to Cook Frozen Onion Rings in the Philips Air Fryer [Step By Step] - July 20, 2023
- Why Does My Philips Air Fryer Keep Turning Off? [Solutions & More!] - June 8, 2023
