
There are endless recipes that can be made in a KitchenAid stand mixer.
You can whip, whisk, beat, cream, shred, grind, sheet and spiralize, all with just one machine. Using the standard attachments and the additional PowerHub attachments, anything dish you can dream up, you can create.
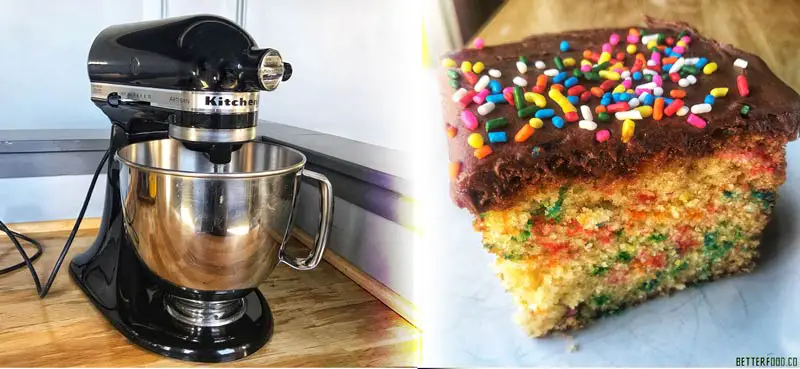
If you are still on the fence about purchasing a KitchenAid stand mixer, it’s time you join the club. They are a workhorse in the kitchen and there are models that can fit into anyone’s budget. From the novice home cook to the veteran restaurant chef, there is a KitchenAid stand mixer for everyone.
Check out our buyer’s guide to help you decide which KitchenAid Stand Mixer is best for you.
While there are endless recipes that can be made in a KitchenAid stand mixer, desserts are often the most common. You can whip egg whites for macarons, cream together butter and sugar for cookies, and mix together cake batter all using a KitchenAid Stand Mixer.
If you are looking to make your first recipe in a new KitchenAid Stand Mixer, or have been using them for years, making a cake in a stand mixer can be simple, easy and delicious.
A cake makes all celebrations better, even if you don’t have anything to celebrate. And making a sheet cake is an easy and low fuss way to bring a cake to a party.
Before you continue reading about how you can use a KitchenAid Stand Mixer to make a cake, let me point out that I’m including a Funfetti Sheet Cake recipe and a video of how to make it at the end of this post. Enjoy!
FAQ’s for Using a KitchenAid Stand Mixer for Cake
Do I need a stand mixer to make a cake?
Technically, no. You can still make a cake without a stand mixer. The main use for the mixer is to beat together the ingredients into a smooth, homogenous batter. You are able to accomplish the task with a handheld egg beater. Or, if you feel up to the workout, by hand.
A stand mixer makes the job much much easier, but it isn’t essential. Your cakes can still taste delicious when mixed by hand, it will just take much more effort.
What attachments do I need to use for cake?
The most important attachment for the KitchenAid stand mixer while baking cake is the flat beater, also called the paddle attachment.
Another accessory that is helpful in making a cake is an additional stand mixer bowl. With an extra bowl, you can mix the batter then immediately mix the frosting, without having to clean and dry the batter bowl.
What is the paddle attachment used for?
All KitchenAid stand mixers come with 3 standards attachments - a flat beater (or paddle,) a wire whisk, and a dough hook.
The paddle attachment is used to cream together the butter and the sugar. This is an important step in many baking recipes.
During the “creaming” process, the water in the butter works to dissolves the sugar. Air is also incorporated into the mixture, creating tiny little bubbles. Once the mixture is combined with flour and eventually baked, these air bubbles help to make the cake light, spongy and fluffy.
What is the wire whip used for?
The wire whip attachment can be used for a multitude of tasks. It can be used to whip egg whites for meringues, batters, and macarons. It can whip and add air into frostings and buttercreams. You can also use it to whip heavy cream to dollop on all types of desserts.
Kitchen tools needed to bake a cake
Click on the links if you want to check customer reviews of each tool on Amazon.
 | |
 | |
 | |
 | |
 | |
 | |
 |
How to Make a Cake using a KitchenAid Stand Mixer
Any type of cake can be made in a KitchenAid stand mixer, but this cake is a fun and playful recipe, using a yellow cake with sprinkles and a chocolate buttercream frosting.
Measure out your ingredients
Baking becomes so much easier if you measure out all your ingredients before you begin. That way you can just pour each ingredient in, and not have to stop and measure during the mixing process.
Mix together the dry ingredients

In a large bowl, whisk together flour, baking soda, salt, and baking powder.
Mix together wet ingredients
In another bowl (preferably with a pour spout) stir together the buttermilk, vegetable oil, and vanilla.

Cream together the butter and sugar
In the bowl of a stand mixer fitted with a paddle attachment, beat the room temperature butter and sugar until fluffy and creamy.

Add eggs, one at a time

Carefully add one egg into the stand mixer bowl at a time. Let the egg mix completely before adding the next one.
Alternate wet and dry ingredients

Add ⅓ of the dry ingredients into the stand mixer bowl and turn onto the slowest speed (as to not create a cloud of flour in your kitchen.)
Add half of the wet ingredients.
Repeat with the remaining third of the dry, half of the wet and the final third of the dry. Mix until you have a smooth batter.

Add sprinkles
Pour in the sprinkles and stir together by hand to disperse throughout.

Pour and bake
Pour batter into a greased 9x13 baking sheet and bake in a preheated 350 °F oven for 1 hour, rotating halfway through. Let cool.

Make the frosting

Add butter to stand mixer bowl fitted with a paddle attachment and beat butter until light and fluffy.
Add powdered sugar, cocoa powder, milk, salt and vanilla and beat until fluffy.

Frost the cake
Once cool, spoon the frosting over the top and spread evenly with an offset spatula.

Decorate
Scatter the sprinkles over the top. Cut, serve and eat.

Funfetti Sheet Cake with Chocolate Frosting Recipe
Makes one 9x13 sheet cake
Prep time: 30 minutes
Bake time: 1 hour
Ingredients
For the cake
3 ¼ cups all-purpose flour
2 tsp baking powder
1 ½ tsp kosher salt
1 ½ tsp baking soda
1 ½ cups buttermilk
¾ cup vegetable oil
2 tsp vanilla extract
2 sticks (1 cup) unsalted butter, cut into small pieces
2 ½ cups granulated sugar
5 large eggs
3 large egg yolks
⅔ cup jimmie sprinkles
Cooking spray
Ingredients
For the chocolate frosting
1 cup unsalted butter, room temperature
3 ½ cups confectioners’ sugar
½ cup unsweetened cocoa powder
3 Tbsp milk
¼ tsp salt
2 tsp pure vanilla extract
¼ cup jimmie sprinkles
Instructions
To make the cake:
- Preheat oven to 350 degrees Fahrenheit and spray a 9x13 baking dish with cooking spray.
- In a large bowl, whisk together flour, baking powder, salt and baking soda until well combined. Set aside.
- In a second bowl (with a spout preferably) stir together buttermilk, vegetable oil, and vanilla extract. Set aside.
- In the bowl of a stand mixer fitted with a paddle attachment, beat together the butter and granulated sugar until light and fluffy, about 4 minutes. Scrape down the sides of the bowl.
- Add the eggs and egg yolks, one at a time, letting each one incorporate before adding the next one. Beat until the mixture has doubled in volume, about 5 minutes. Scrape down sides of the bowl a few times.
- Alternate adding the dry and wet ingredients, starting with ⅓ of the dry (flour mixture), ½ of the wet (buttermilk mixture.) Repeat and end with the last ⅓ of the dry ingredients. Scrape down sides of the bowl again.
- Pour in the sprinkles and stir by hand to incorporate throughout the batter.
- Pour the batter out onto the prepared baking dish and place in the oven. Bake for 1 hour, rotating the pan halfway through.
To make the frosting:
- In the bowl of a stand mixer fitted with a paddle attachment, beat the softened butter until it’s light and creamy, about 3 minutes.
- Slowly add powdered sugar, cocoa powder, milk, salt and vanilla and beat until smooth and fluffy.
To assemble the cake:
- Once the cake has cooled, spoon the frosting over the top and spread out evenly with an offset spatula.
- Scatter the ¼ cup of sprinkles over the top of the cake.
- Cut into squares and serve.
Here is a summary video of how you can make it:
Final Thoughts
Using a KitchenAid stand mixer to bake a cake can be simple and easy.
For more recipe ideas to make in your KitchenAid stand mixer, check out our article - What To Make In My New KitchenAid Stand Mixer.